Return to doc.sitecore.com

Valid for Sitecore
Item-specific Context Menu

While adding a right mouse button context menu is simple, sometimes you will find that you need to vary the options available in the menu depending on some external conditions or a property of the selected Item. Furthermore, right clicking does not select the Item in the list, so we cannot use the conventional Selected property in this situation. The article shows how to deal with these problems.

We will use a simple example application:

Application layout

1.  XML Layout Code

1<?xml version="1.0" encoding="utf-8" ?>
2<control xmlns:def="Definition" xmlns="http://schemas.sitecore.net/Visual-Studio-Intellisense">
3  <supportplayground>
4    <FormPage>
5      <CodeBeside Type="Sitecore.Support.Codebeside,support.playground.dll"/>
6      <GridPanel class="scBackground" vAlign="top" Height="100%" Width="100%">
7        <Scrollbox GridPanel.Height="100%" >
8           <!-- Note the 'ContextMenu = GetContextMenu' attribute. It means that every time user
9                right clicks the listview, the GetContextMenu() method is called -->
10           <Listview ID="Listview" ContextMenu = "GetContextMenu" MultiSelect="false" View="Icons" Background="White">
11              <ListviewHeader>
12                 <ListviewHeaderItem Name="name" Header="Name" />
13              </ListviewHeader>
14           </Listview>
15        </Scrollbox>
16      </GridPanel>
17    </FormPage>
18  </supportplayground>
19</control>

2.  XAML Layout

As you can see, the application is quite simple. Apart from the GridPanel, the application consists only a Listview wrapped in a Scrollbox. The most important thing to notice is that the context menu attribute is set for the entire list view, so it is the control that generates the context menu event. This will later help us understand the difference between the ClientRequest.Source and ClientRequest.Control.

Back to our problem, right clicking doesn't select a Listview Item, so you cannot use the Selected property to determine which Item was right clicked. Instead, use the ClientRequest.Source property. Use it do determine the primary event source, get the Listview Item that was clicked, select it, and extract its values. After that we can apply the custom logic we need to populate the context menu and show it to the User.

Please read the code comments to better understand the execution flow.

3.  Code-beside Code

1using using
12
13namespace Sitecore.Support
14{
15   public class Codebeside : BaseForm
16   {
17      protected Listview Listview;
18
19      protected override void OnLoad(EventArgs e)
20      {
21         base.OnLoad (e);
22
23         if (!Context.ClientPage.IsEvent)
24         {
25            // populate listview with sample items
26            string[] items = new string[] {"Item A", "Item B", "Item C", "Item D"};
27            foreach(string item in items)
28            {
29               ListviewItem listItem = new ListviewItem();
30               listItem.ID = Control.GetUniqueID("I");
31               Context.ClientPage.AddControl(Listview, listItem);
32               listItem.Header = item;
33               listItem.Value = item + " --value";
34               listItem.Icon = "People/24x24/tv.png";
35            }

36         }

37      }

38
39      // Dynamically contruct and show the context menu
40      protected void GetContextMenu()
41      {
42         // Get the source of the event. Note that ClientRequest.Control will return a Listview, while
43         // the ClientRequest.Source will return a ListviewItem - just what we need
44         System.Web.UI.Control control = Listview.FindControl(Context.ClientPage.ClientRequest.Source);
45
46         if (control is ListviewItem)
47         {
48            ListviewItem item = (ListviewItem) control;
49            
50            // Since we automatically select the items, it is a good idea to deselect all previously
51            // selected items (only if you don't want the multiselect enabled)
52            Listview.ClearSelection();
53            
54            // Select the clicked item
55            item.Selected = true;
56
57            // Create a context menu on the fly
58            Menu menu = new Menu();
59
60            // Add a menu item. Click will send the local:action message, passing
61            // listItem's value as a message parameter
62            menu.Add(item.Header + " Action", "Applications/16x16/document_view.png", "local:action(value=" + item.Value + ")");
63            menu.AddDivider();
64            menu.Add("Generic menu item", "Applications/16x16/document_ok.png", "local:nothing");
65            // Show the menu
66            Context.ClientPage.ClientResponse.ShowContextMenu("", "", menu);
67         }

68         else
69         {
70            Context.ClientPage.ClientResponse.Alert("Control: " + control.GetType().Name);
71         }

72      }

73
74      // Method is invoked when the item specific menu item is clicked
75      [HandleMessage("local:action")]
76      protected void ItemSpecificAction(Message message)
77      {
78         // Extract a parameter from the message.
79         Context.ClientPage.ClientResponse.Alert("Item specific action method received value: \"" + message.Arguments["value"] + "\"");
80      }

81   }

82}

4.  Code-beside

Context menu

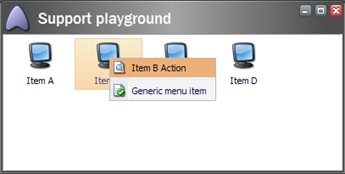
So when a User right clicks the 'Item B' Item, the custom item-specific context menu Item is displayed and the Item itself is selected. You might find this behavior more appropriate than the default behavior.

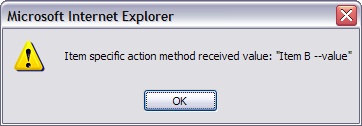
If the User clicks the 'Item B Action' menu option, the ItemSpecificAction() method is invoked. This also illustrates how you can use a message to pass any number of arguments to the handler method. In this example, we pass the value of the clicked Listview Item.


Popup window


To install sample source code, add a new application to the Sitecore Client and use the supplied xml layout and code-beside class.
ItemSpecificContextMenu